
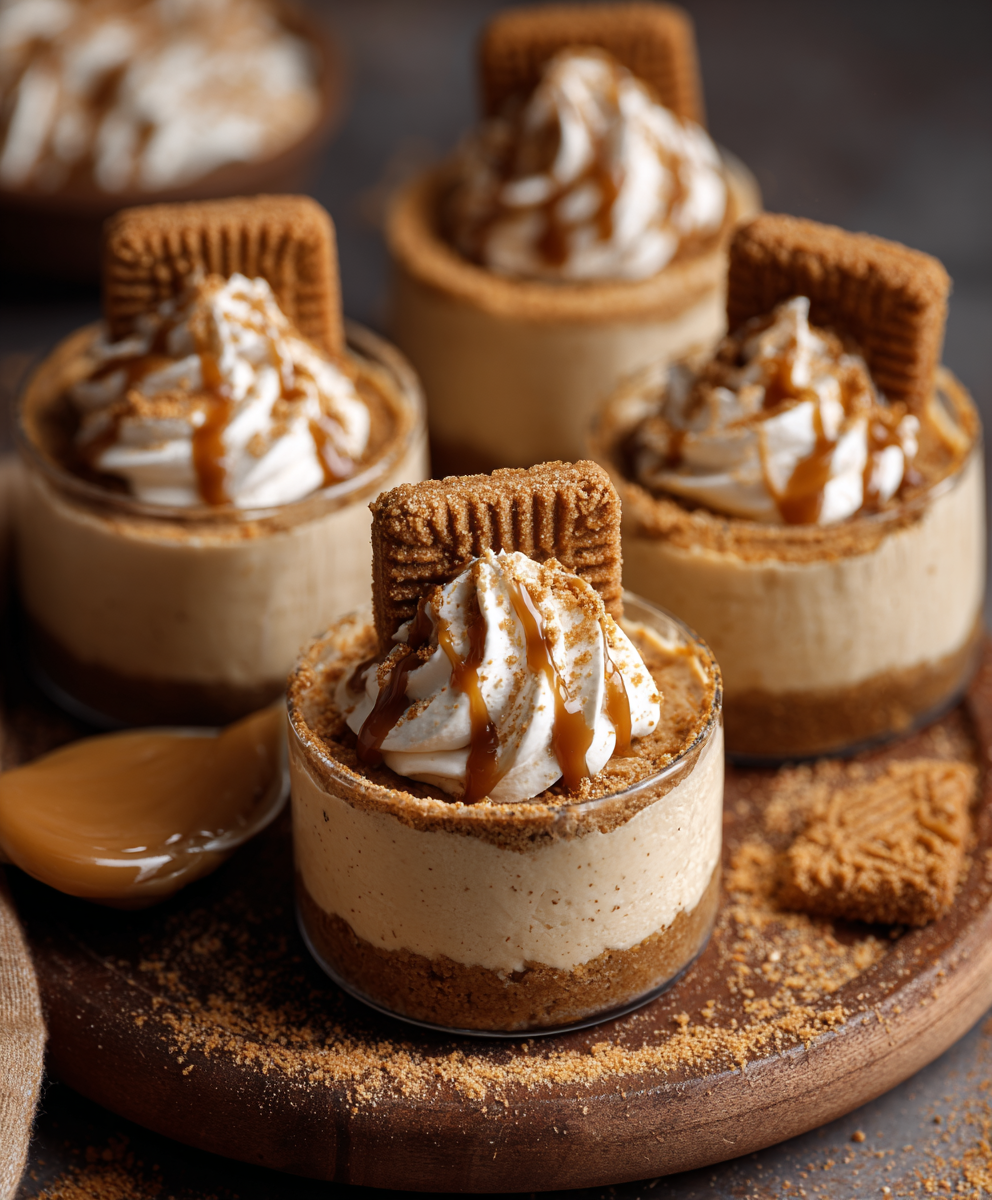
Biscoff Cheesecake Cups

Creamy no-bake cheesecake cups layered with crunchy Biscoff cookie crust and a silky spiced cookie butter filling — perfect for quick desserts and make-ahead treats.

This little dessert has become my favorite quick finish to any meal. I first made these Biscoff cheesecake cups during a rainy afternoon when I had a craving for something sweet but did not want to heat the oven. The combination of crunchy spiced cookie crumbs and a cloudlike filling flavoured with cookie butter hit the exact comfort note I was looking for. The texture is a contrast of crisp base and pillowy filling, with a warm caramelized spice from the cookie butter that lingers with every spoonful.
I remember serving these at a small family get-together and watching everyone lean forward as they tasted the first spoonful. The cups disappeared faster than anything else on the table and even the most particular relative asked for seconds. What makes these so special is how simple they are to assemble, how few ingredients are required, and how well the flavors hold up even if you make them a day ahead. They feel indulgent but not fussy, and they travel well in small jars for picnics or potlucks.
Why You'll Love This Recipe
- Fast assembly with no baking required so the dessert is ready to chill in about 20 minutes of active work and sets in the refrigerator in two to four hours.
- Uses pantry staples and one signature ingredient, Biscoff cookie butter, which gives the cups a warm caramelized spice without complicated syrups or reductions.
- Flexible portions — make six to eight individual cups in jars, ramekins, or glasses for easy gifting, parties, or portion control.
- Make-ahead friendly: you can assemble a day ahead and keep chilled for effortless entertaining while maintaining texture and flavor.
- Customizable crunch and topping options so you can dial the sweetness or texture for different tastes and dietary needs.
- Perfect for crowd-pleasing with minimal equipment — a hand mixer, bowls, and a few spoons will do the job.
When I first tried this combination, I was surprised by how adult and cozy the flavor profile felt. Family reactions have ranged from nostalgic smiles to requests for the recipe, and the ease of assembly means I make these for last-minute guests or during holidays when oven space is limited. They are one of those desserts that consistently get compliments without much effort.
Ingredients
- Biscoff cookie crumbs: Use one cup of finely crushed Lotus Biscoff cookies for the base. Finely crushed crumbs pack well and give a crisp, sandy texture; pulse in a food processor or place in a sealed bag and crush with a rolling pin for consistent results.
- Melted butter: Three tablespoons of unsalted butter bind the crumbs into a firm, sliceable base. Using unsalted butter lets you control salt levels; if you prefer a deeper flavor, choose European-style butter.
- Cream cheese: Eight ounces of full-fat cream cheese, softened at room temperature for at least 30 minutes. Softening prevents lumps and ensures a silky filling; if using a brand like Philadelphia, leave it on the counter until easily pressed.
- Heavy whipping cream: One cup of heavy whipping cream whipped to stiff peaks creates the airy texture. Heavy cream is essential for stability; do not substitute light cream or half and half if you want the same hold.
- Powdered sugar: One third cup adds sweetness and helps stabilize the filling. Powdered sugar dissolves quickly and keeps the texture smooth.
- Biscoff spread: One third cup of cookie butter, warmed for ten seconds in the microwave until spreadable. Use Lotus or another speculoos spread; warming helps it fold into the cream cheese without streaks.
- Vanilla extract: One teaspoon of pure vanilla to round out the flavors and lift the caramelized notes of the cookie butter.
- Topping: A quarter cup of melted cookie butter for drizzling and extra crushed Biscoff cookies if you like added crunch on top.
Instructions
Make the Crust: Combine one cup of finely crushed Biscoff crumbs with three tablespoons of melted unsalted butter in a small bowl. Stir until all crumbs are moistened and the mixture holds together when pressed. Spoon one to two tablespoons into each serving cup or jar and press down firmly with the back of a spoon or the bottom of a small glass to form a compact base. Place the lined cups in the refrigerator to chill while you prepare the filling. Chilling firms the base and prevents it from turning soggy when the filling is added. Prepare the Cheesecake Filling: In a mixing bowl, beat eight ounces of softened cream cheese with one third cup of powdered sugar and one teaspoon of vanilla extract until very smooth and free of lumps. If you see any small bits, scrape the bowl and continue beating briefly. In a separate chilled bowl, whip one cup of heavy whipping cream to stiff peaks using a hand mixer or stand mixer. Fold the whipped cream into the cream cheese mixture gently in three additions using a spatula; this maintains the airiness. Warm one third cup of Biscoff spread for about ten seconds so it is soft but not runny, then fold it in until streak-free. The goal is a light, stable filling with a mousse-like texture. Assemble the Cups: Using a spoon or piping bag fitted with a wide tip, pipe or spoon the cheesecake filling into each chilled cup over the prepared crust, filling nearly to the top. Smooth the surface with an offset spatula if desired. Drizzle about a teaspoon of melted Biscoff spread on each cup and use a skewer to create a small swirl if you like a marbled look. Sprinkle crushed Biscoff cookie pieces on top for an added crunch and visual contrast. Chill and Serve: Cover the assembled cups loosely with plastic wrap and refrigerate for a minimum of two hours to allow the filling to set. For best texture, chill three to four hours. Serve cold straight from the refrigerator. If you are transporting the cups, keep them in a covered container with ice packs to maintain temperature.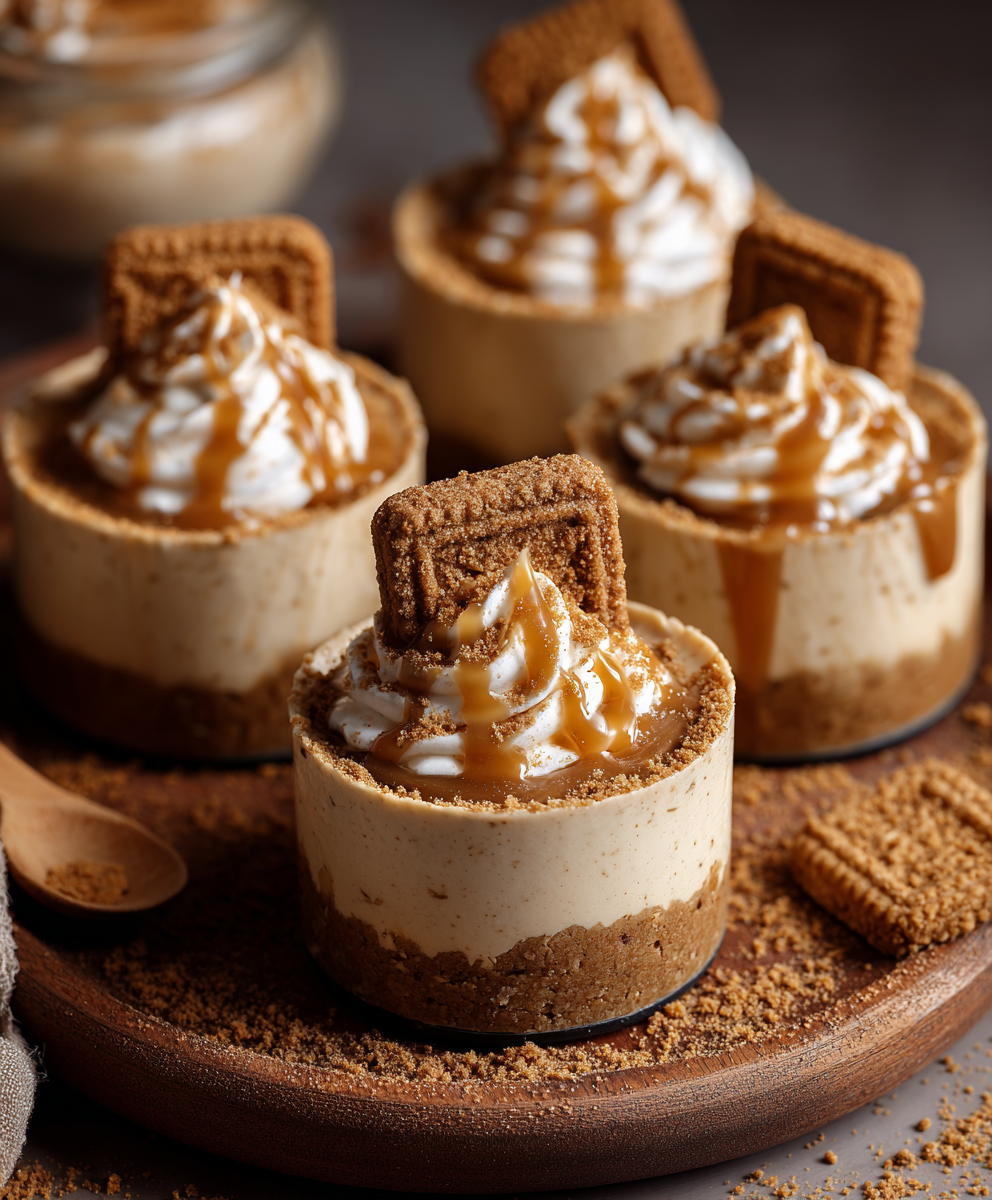
You Must Know
- These cups are high in fat and calories because of the cream cheese and heavy cream; enjoy them as an occasional treat and control portions by using small jars.
- Fully chilled cups will hold their shape for up to two days in the refrigerator; for longer storage freeze for up to three months, thawing in the fridge overnight before serving.
- This is a no-bake preparation so there is no oven time; active work is about 20 minutes and passive chill time is two to four hours.
- Because Biscoff cookies contain wheat and soy lecithin and the filling contains dairy, this dessert is not suitable for people with gluten, soy, or dairy allergies without substitutions.
One of my favorite aspects is how adaptable the texture is. If you prefer a firmer bite, increase the cream cheese by two ounces and reduce the whipped cream slightly. My family loves a subtle swirl of melted Biscoff on top; kids ask for extra cookie crunch while adults appreciate the slightly restrained sweetness. Every time I make these, someone asks for the recipe and then credits me for the simple but memorable dessert.
Storage Tips
Store the cups in an airtight container in the refrigerator at four degrees Celsius or lower. They will stay fresh and maintain texture for two days; after that the crunch softens and the filling slightly weeps. For longer storage, freeze the assembled cups without the fresh crunchy topping for up to three months. To serve, thaw in the refrigerator overnight and add crushed Biscoff just before serving to keep the crunch. Use glass jars with tight lids for transporting to picnics and remove them from the container about ten minutes before serving for the best mouthfeel.
Ingredient Substitutions
If you need dairy-free options, substitute the cream cheese with a high-quality plant-based cream cheese and use a coconut-based whipped topping that whips to stiff peaks. Note that flavor and mouthfeel will shift to a coconut note. For a gluten-free version, use gluten-free speculoos or a gluten-free spiced cookie crushed to form the base and ensure the cookie butter is certified gluten-free. If you want less sugar, reduce powdered sugar to one quarter cup and add a touch more vanilla to balance. Substituting Greek yogurt for a portion of the cream cheese will yield a tangier cup with less richness, but reduce whipped cream slightly to keep structure.
Serving Suggestions
Present the cups in small clear jars or stemless glasses for an elegant look. Garnish with a thin swirl of warmed cookie butter, a few toasted almond slivers for contrast, or a light dusting of cinnamon. Pair with a strong coffee, espresso, or a caramel latte for a complimentary flavour pairing. For a brunch spread, serve these alongside fruit compote or poached pears to lift the richness. These cups are also perfect as single-serve desserts at dinner parties where guests can choose their own toppings.
Cultural Background
Speculoos cookies originate from the Low Countries and northern France and are traditionally spiced with cinnamon, nutmeg, and cloves. The transformation of those cookies into a sweet, spreadable paste modernized the flavor and made it versatile for desserts. The idea of combining cookie butter with a creamy filling is contemporary comfort food — it borrows elements from European spiced biscuits and American no-bake cheesecakes, creating a fusion that highlights the warm spices and caramelized sugar notes of the original biscuit.
Seasonal Adaptations
In autumn and winter, add a pinch of ground ginger or allspice to the crust for holiday warmth and use toasted pecans on top. For spring and summer, lighten the profile by adding a tablespoon of lemon zest to the filling and serving with macerated berries. Holiday versions can include a thin layer of salted caramel between the crust and filling for a more decadent finish. For festive presentations, use clear cups with a ribbon and label the flavor combination as a shareable gift.
Meal Prep Tips
Make the crust and filling a day ahead and store separately in the refrigerator. Right before serving, assemble the cups, add the melted cookie butter drizzle and crunchy topping. If preparing multiple batches for a party, pipe the filling quickly using a large piping bag to speed assembly and create consistent portions. Label containers with preparation date and use cold gel packs for transport to ensure the filling holds during transit. Single-serve jars make great grab-and-go snacks for busy days.
These Biscoff cheesecake cups are simple, adaptable, and reliably crowd-pleasing. Whether you make a small batch for family or scale up for a gathering, they provide a satisfying dessert that feels thoughtfully homemade with minimal fuss. I hope you make them your own and enjoy the cozy, spiced-sweet comfort they bring to the table.
Pro Tips
Soften the cream cheese to room temperature for at least 30 minutes to achieve a lump-free filling.
Warm cookie butter for 8 to 12 seconds in the microwave to make it easier to fold into the filling.
Chill the mixing bowl and beaters for whipping cream to help achieve firm peaks faster.
Press the crust firmly into the base so the filling doesn't mix into loose crumbs when serving.
This nourishing biscoff cheesecake cups recipe is sure to be a staple in your kitchen. Enjoy every moist, high protein slice — it is perfect for breakfast or as a wholesome snack any time.
FAQs about Recipes
How long should I chill the cups?
Chill at least two hours to allow the filling to set; three to four hours gives best texture. If frozen, thaw overnight in the refrigerator.
Can I use low-fat cream cheese or light cream?
Use full-fat cream cheese and heavy whipping cream for the best texture. Light creams will not whip to stiff peaks and the filling will be loose.
Tags
Biscoff Cheesecake Cups
This Biscoff Cheesecake Cups recipe makes perfectly juicy, tender, and flavorful steak every time! Serve with potatoes and a side salad for an unforgettable dinner in under 30 minutes.
Ingredients
Crust
Filling
Topping
Instructions
Make the Crust
Combine Biscoff crumbs and melted butter, press one to two tablespoons into each cup, and chill to firm the base.
Make the Cheesecake Filling
Beat softened cream cheese with powdered sugar and vanilla until smooth. Whip heavy cream to stiff peaks and fold into the cream cheese in thirds. Fold in warmed Biscoff spread until combined.
Assemble the Cups
Spoon or pipe the filling over each chilled crust, drizzle melted Biscoff and add crushed cookies if desired.
Chill and Serve
Refrigerate for a minimum of two hours, preferably three to four, before serving. Keep chilled until ready to serve.
Last Step: Please leave a rating and comment letting us know how you liked this recipe! This helps our business to thrive and continue providing free, high-quality recipes for you.
Nutrition
Did You Make This?
Leave a comment & rating below or tag
@magicmealideas on social media!
Categories:
You might also like...
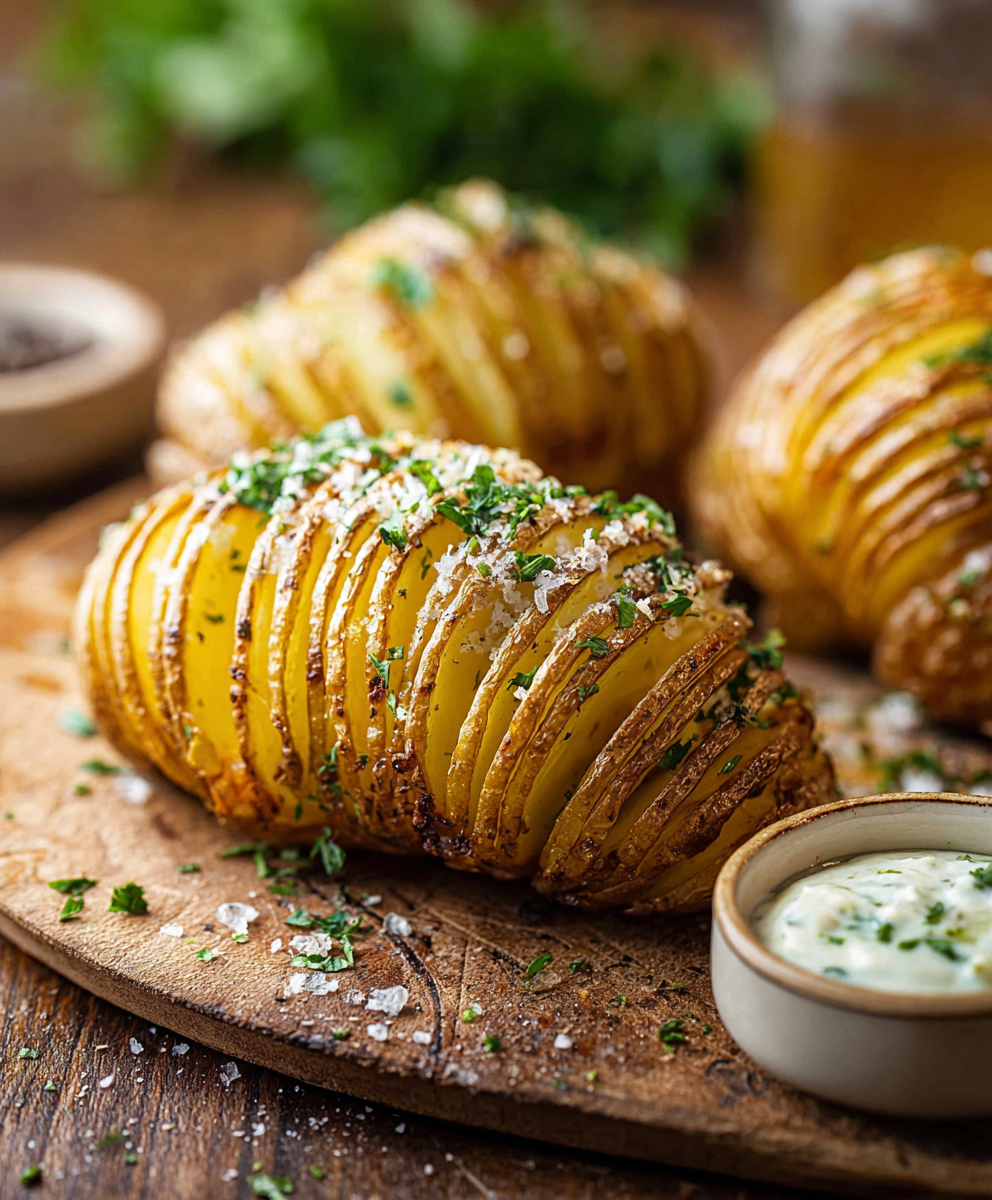
Classic Hasselback Potatoes
Thinly sliced, butter-brushed russet potatoes baked until the edges crisp and the insides stay tender — a simple side that feels special.
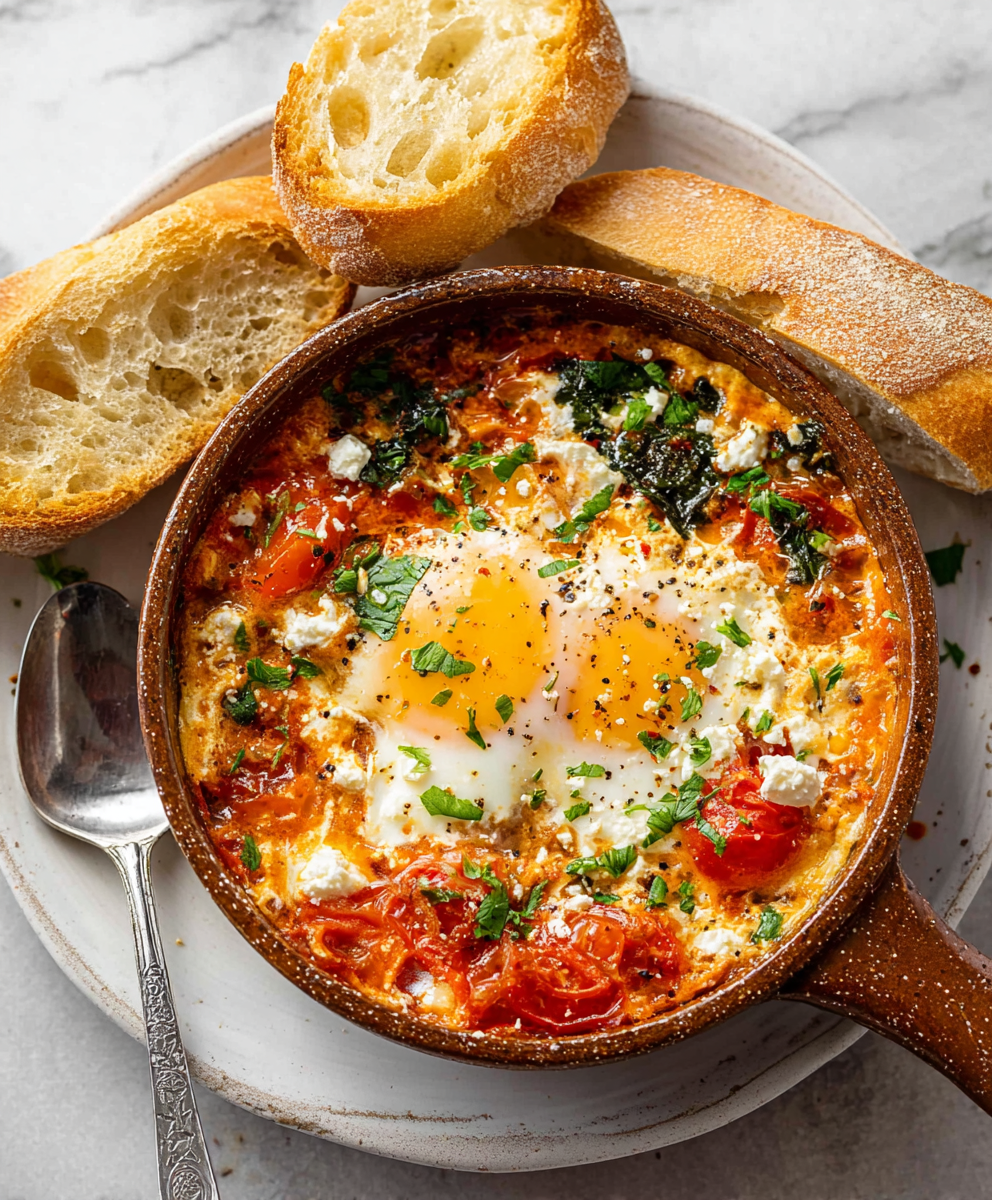
Baked Feta Eggs
A bright Mediterranean-inspired skillet of blistered tomatoes, roasted feta, tender spinach and baked eggs — perfect for breakfast, brunch or a light dinner.

Key Lime Pie Yogurt Bark
A bright, creamy frozen treat that tastes like key lime pie — made with Greek yogurt, zesty lime, crunchy gluten-free graham crumbs and toasted coconut for a refreshing, protein-packed snack.
Did You Make This?
Leave a comment & rating below or tag @magicmealideas on social media!
Rate This Recipe
Share This Recipe
Enjoyed this recipe? Share it with friends and family, and don't forget to leave a review!
Comments (1)
This recipe looks amazing! Can't wait to try it.
Comments are stored locally in your browser. Server comments are displayed alongside your local comments.

Hi, I'm Chef!
What's Popular

30-Minute Meals!
Join to receive our email series which contains a round-up of some of our quick and easy family favorite recipes.